Sprint 3 of Thunder Vault’s development has ended! This sprint has been a pretty exciting one, with our first digital playtest, some good feedback, and a lot of big changes to come!
Starting with the playtest, we had the player set up in a simple level with some obstacles to vault over and walls to bounce off of. I wanted to give the player some kind of goal, so I made an enticing tower in the middle of the level that required 4 increasingly hard jumps to ascend. This proved pretty effective! All of the playtesters that I watched tried multiple times to climb the tower, although I think I was the only one who was able to reach the top sadly. This indicated to me that while the mechanics felt comfortable to me, they were not nearly as intuitive for our playtesters. We also lacked any kind of tutorial or how to play section, meaning we had to explain the controls to our testers verbally. I would like to somehow design our next level in a way that encourages the player to explore different possibilities and techniques with the pole vault.
I prepared a feedback form for the playtest as well, and I tried to keep it as short as possible so that testers wouldn’t get bored while answering questions and give less effort into their answers. Much of the feedback that we did get indicated that our movement mechanic didn’t quite feel accurate to pole vaulting.
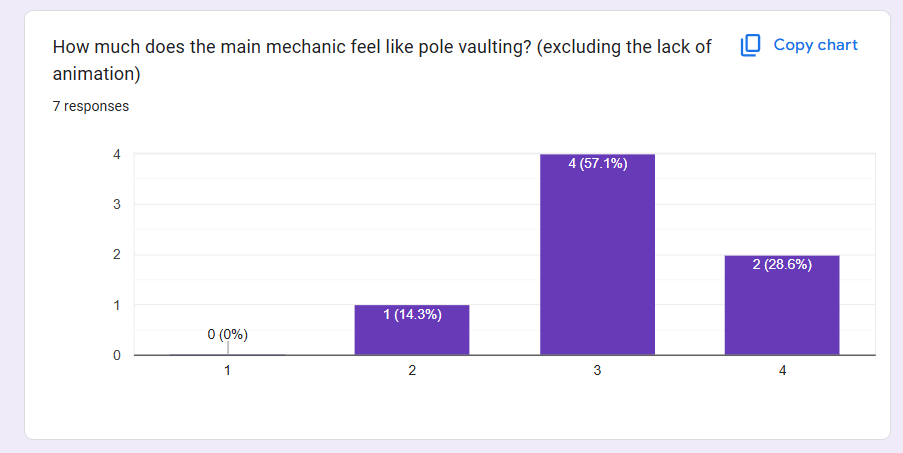
While speaking with the testers, many of them said that the pole vault felt like it gave you too much horizontal distance and not enough vertical distance. I believe that may be because of the yellow arrow used to show the direction the player will travel upon releasing the pole vault. The arrow is quite long, but doesn’t really accurately represent the distance the player will travel in the air. I think that testers expected that the arrow would show the distance they would travel, but upon releasing the left mouse button, they didn’t go nearly as high as they expected.
Ultimately, despite these flaws all testers said that they would play again if the game included more content, which affirms my belief that our concept is a promising one! This playtest has given me new insight into our project, and motivation to refine it into something even better! Sadly, I haven’t been able to do much work on the project since the playtest, as I’ve been busy catching up on other homework, but I have plans for an overhaul of the pole vaulting mechanic.

I plan to keep having the player hold left click to plant their pole, but this time, as they move closer to the location of the pole, they will meet resistance to simulate the “flexing” of the pole. Next, upon jumping, that built up resistance will be transferred into vertical velocity, simulating the actual “vaulting” portion of pole vaulting. I believe that while this method may be slightly less fluid, this more accurate representation of pole vaulting will make the player feel more involved in their movement, and make it a much more immersive imitation of pole vaulting. I’m confident in my ability to program the physics of this mechanic, but a lot less sure of how I could animate a pole that can flex and bend in the way that I’ve drawn. I plan on getting the physics right first, and then seeing what I can do about the visuals with whatever time I have left. This sprint has given me a new burst of motivation that I can’t wait to act on, and I’m very excited to share what I’ve completed by the end of Sprint 4!
Comments
Post a Comment